What's Changing
Google Chat and Google Meet are being replaced by Microsoft Teams. The big difference? Teams combines chat, video calls, file sharing, and more into a single app instead of separate tools.
Migration Heads-Up
This is the most important migration warning on this site:
- Your Google Chat history will not migrate. There is no tool that can transfer Google Chat messages to Microsoft Teams. All your past chats, group conversations, and Chat Space messages will no longer be accessible after the move to Teams. If you have important information in Google Chat — decisions, approvals, shared files, key conversations — save them now (screenshot, copy to a document, or download files).
- Google Chat Spaces will not automatically become Teams channels. Your department's Teams and channels have been set up by IT. You'll find your team's channel when you sign into Teams.
- Google Meet recordings (over 3,700 across Blue Ant) are being moved to OneDrive and Microsoft Stream — they won't appear in Teams directly, but you'll find them in your OneDrive "Recordings" folder.
What Stays the Same
- Instant messaging - send quick messages to colleagues
- Video calls - face-to-face meetings with one click
- Group conversations - chat with multiple people at once
- Screen sharing - show your screen during meetings
- Meeting scheduling - invite people and set times
First Thing to Do When You Open Teams
Separate Your Chats from Your Teams (Groups)
When you first open Microsoft Teams, your chats and your team channels may appear combined in one section. This can be confusing. The first thing to do is separate them:
- Click the three dots (…) in the top-right corner of Teams
- Go to Settings
- Click on Chats and Channels
- Switch it to Separate
Now you will have a dedicated Chat section (for direct messages and group chats) and a dedicated Teams section (for your department channels). These are two different things and keeping them separate avoids confusion.
Opening Teams
- Desktop: Click the Teams icon on your taskbar or search for "Teams"
- Web: Go to teams.microsoft.com
- Phone: Download the Teams app from the App Store or Google Play
The Teams Layout
When you open Teams, you'll see these sections on the left:
Here's what Teams looks like with a chat conversation open:
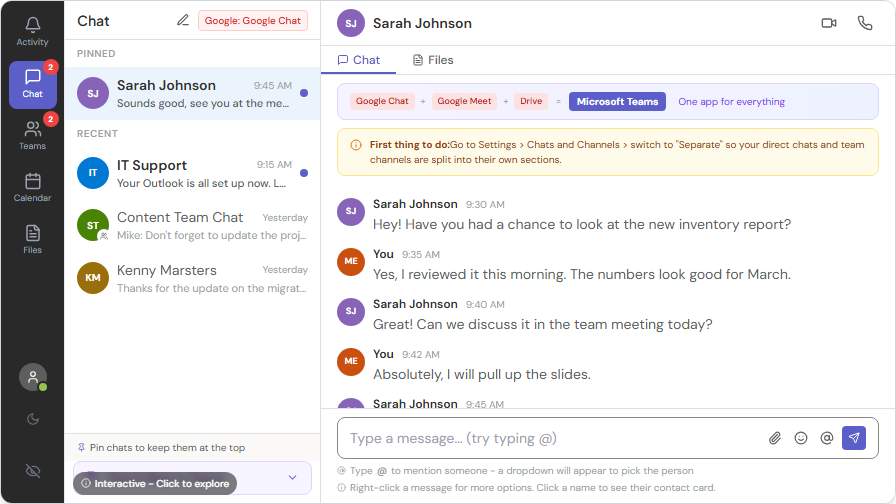
- Activity - notifications and mentions (like a news feed)
- Chat - your direct messages and group chats
- Teams - your team channels for ongoing conversations
- Calendar - your meetings and schedule
- Files - recent files shared in chats and channels
Google Chat & Meet to Teams - Quick Comparison
| Google Chat/Meet | Microsoft Teams |
|---|---|
| Direct message | Chat |
| Group conversation | Group Chat |
| Google Space | Teams Channel |
| Google Meet call | Teams Meeting |
| Share screen in Meet | Share screen in Teams |
Messaging Basics
Sending a Message
- Click Chat in the left sidebar
- Click the new chat icon (pencil icon at the top)
- Type the person's name
- Type your message and press Enter
Reacting and Replying
- Hover over a message to see emoji reactions (thumbs up, heart, etc.)
- Right-click a message to reply, forward, or bookmark it
- Use @mentions to get someone's attention: type @ followed by their name
You can also right-click any chat message to see a context menu with useful options like Pin, Mute, Mark as read, and more.
Sharing Files in Chat
- Click the paperclip icon to attach a file
- Or just drag and drop a file into the chat
Important: Files shared in a Chat are saved to your OneDrive. Files shared inside a Teams Channel are saved to SharePoint. This is why channels are better for team documents - everyone can find them, even months later.
Contact Cards
Hover over or click anyone's name or profile picture in Teams to see their contact card:
- See their status (Available, Busy, Away)
- View their phone number and email
- See their org chart — who they report to and their team
- Click Chat to start a conversation or Call to ring them directly
- "You also work with" suggestions show mutual colleagues
This is great when you're not sure who someone is or need to find the right person in another department.
Files Shared in Chat
Every chat keeps a record of all files shared in that conversation. Click the Files tab at the top of any chat:
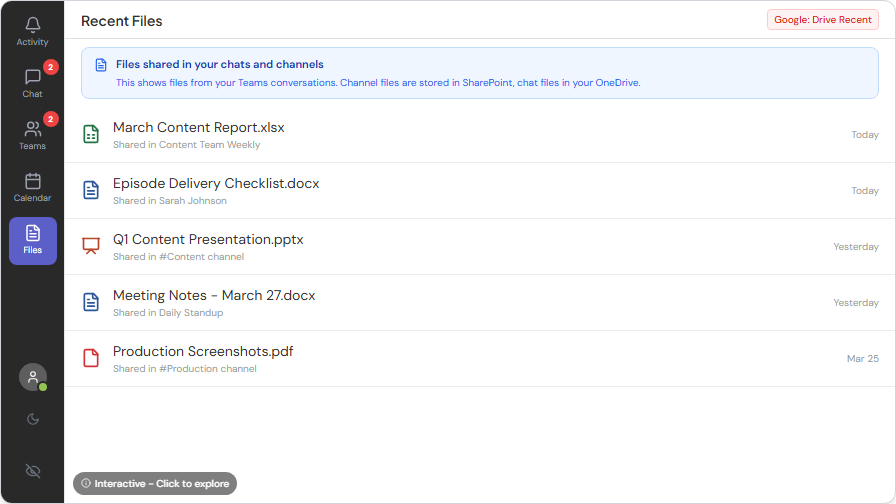
- See every file shared in the chat, organized by date
- Click any file to open it
- Files shared in chat are stored in the sender's OneDrive
This is useful when someone sent you a document weeks ago and you need to find it again — no scrolling through old messages.
Mac Users: Teams for Mac works almost identically to the Windows version. The one thing to watch for: the first time you share your screen, macOS will ask you to grant Screen Recording permission in System Settings > Privacy & Security. Approve it once and you're set. Keyboard shortcuts use Cmd instead of Ctrl (e.g., Cmd + Shift + M to mute).
Video Meetings
Joining a Meeting
- When it's time, click Join from your calendar notification or the Teams calendar
- Choose your audio and video settings
- Click Join Now
Meeting Options (Set Before You Send the Invite)
Before sending a Teams meeting invite, you can control how the meeting behaves:
- Who can bypass the lobby - control who gets in automatically vs. who waits for you to admit them
- Who can present - limit screen sharing to just you or co-organizers
- Mute attendees on entry - useful for large group calls
- Turn on automatic recording - the recording is saved to the meeting organizer's OneDrive in a "Recordings" folder
To access these options: when creating the meeting, toggle the Teams meeting switch on, then click Options.
Meeting Limits and Capabilities
A few things that may differ from Google Meet:
- Maximum participants — pending confirmation from IT. Microsoft Teams supports up to 1,000 interactive attendees in a standard meeting and 10,000 view-only for large town halls; Blue Ant's licensing tier confirms these limits.
- Copilot in meetings — whether AI Copilot is enabled in Teams meetings is pending IT confirmation. If Copilot is on, you'll see a Copilot icon in the meeting toolbar to summarize, take notes, or query the discussion in real time.
- AI note-takers — Blue Ant Media's previous policy was no third-party note-takers (Otter, Fireflies, etc.) in meetings. Whether this policy carries over to the Microsoft Teams environment is pending IT/leadership confirmation. Until confirmed, assume the existing no-third-party-note-takers policy stands.
During a Meeting
- Camera - toggle on/off with the camera icon
- Microphone - mute/unmute with the mic icon
- Share Screen - click the share icon to show your screen
- Chat - send messages during the meeting
- Raise Hand - click the hand icon to get the speaker's attention
- Leave - click the red phone icon when you're done
Delivery Options for Chat Messages
When sending a chat message, you can set its urgency level:
- Standard - normal message delivery
- Important - adds a red "!" indicator so the recipient sees it stands out
- Urgent - notifies the recipient every 2 minutes for 20 minutes until they reply. Use this sparingly - only for genuinely time-critical situations
To set delivery options, click the "!" icon below the message box before sending.
Managing Notifications
Teams can be noisy if you don't tune it. Here's how to stay informed without being overwhelmed:
Per-Channel Notifications
If a channel posts too often for your needs:
- Click the … next to the channel name
- Select Channel notifications
- Choose "Only show in feed when @mentioned"
You'll still see the posts when you visit the channel, but you won't get a notification for every message.
Quiet Hours (Do Not Disturb)
Stop notifications outside work hours:
- Go to Settings > Notifications
- Set up Quiet hours - pick a start and end time (e.g., 6 PM to 7 AM)
- During quiet hours, you won't get any Teams notifications on your phone or desktop
Status Settings
Your status tells colleagues whether you're available:
- Available (green) - free to chat
- Busy (red) - in a meeting or focused, messages are not urgent
- Do Not Disturb (red with dash) - no notifications at all, only urgent messages break through
- Away (yellow) - stepped away from your desk
Set your status by clicking your profile picture in the top right > select a status. You can also set a custom status message like "In a customer meeting until 3pm."
Meeting Recordings
When a meeting is recorded:
- The recording is saved to the meeting organizer's OneDrive in a folder called "Recordings"
- A link to the recording automatically appears in the meeting chat after the meeting ends
- Recordings are available for 60 days by default (your IT team can change this)
- Anyone who was invited to the meeting can view the recording
Meet Now vs Scheduled Meeting
- Meet Now - for spontaneous calls. Click the camera icon in a chat or channel to start an instant video call. Great for "can we talk for 2 minutes?"
- Scheduled Meeting - for planned discussions. Use the Calendar to set a time, add attendees, and send invites. Attendees see it on their calendar with a Join button
Video Call Tips
If you're joining a video call from the office or your desk:
- Test your audio before joining - click the settings gear in the pre-join screen
- Blur your background - click the background filters icon before joining. This hides whatever's behind you (messy desk, busy office)
- Mute when not speaking in larger meetings to cut background noise
- Use the chat during the meeting to share links or notes without interrupting the speaker
More Tips
- Set your status (Available, Busy, Away) so colleagues know when you're free
- Pin important chats to the top of your chat list for quick access
- Use Teams on your phone for quick messages when you're away from your desk
- Don't worry about missing messages - Teams keeps everything saved, and you can catch up anytime
- Teams replaces phone calls for internal communication in many cases - try a quick Teams call instead of dialing a number
- Your Teams Calendar and Outlook Calendar are the same - meetings show in both places
Quick Reference Downloads
Need Help?
- Check the other modules on this training site
- Browse other modules on this site
- Contact your regional IT support team (the Contact page lists the right email for your office)